

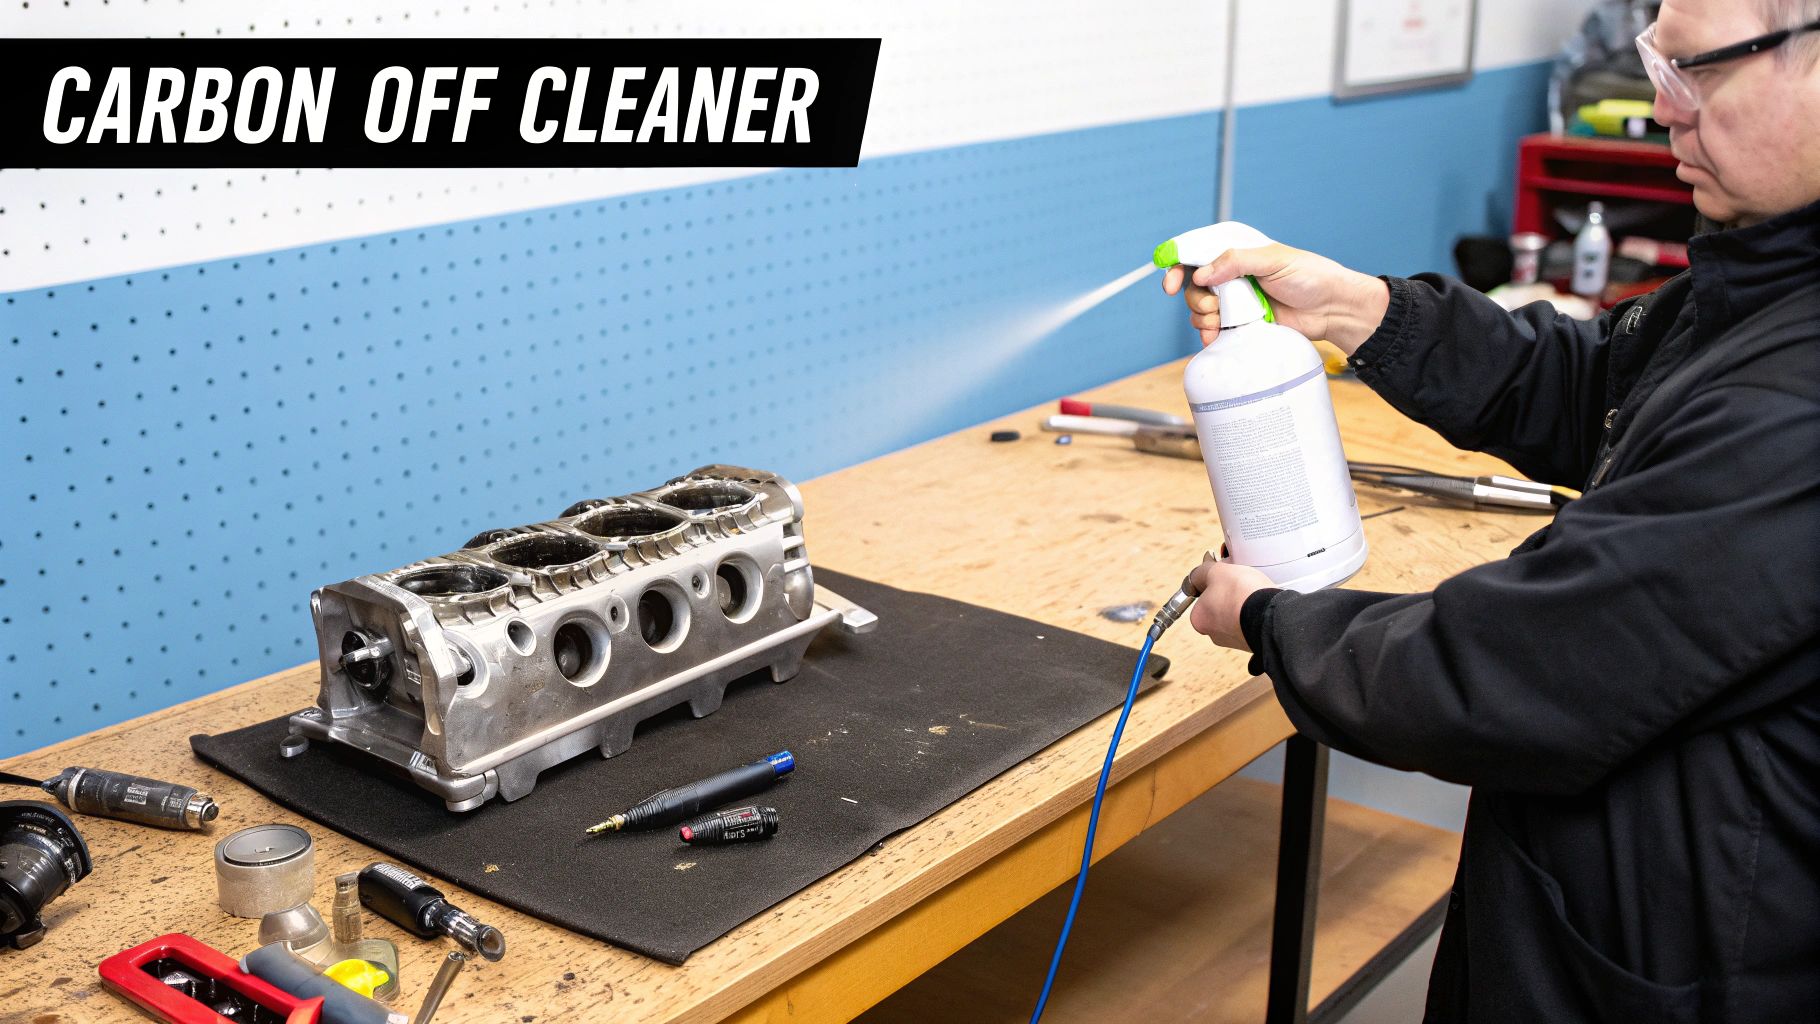
A Chef's Guide to Using Carbon Off Cleaner Safely
Baked-on carbon is the bane of every busy kitchen. It's that stubborn, black gunk that seems to fuse itself to your grills, ovens, and fryers, laughing in the face of your daily cleaning routine. To tackle that, you need a professional-grade carbon off cleaner. This isn't your everyday degreaser; it's a heavy-duty formula designed to dissolve the toughest, heat-bonded grime and get your equipment back to looking and performing its best. For restaurant owners and chefs, staying informed about the best tools for the job is a key industry trend.
Why Your Standard Degreaser Isn't Cutting It
In the chaos of a professional kitchen, it's easy to think all cleaners are created equal. They're not. While your daily degreaser is great for wiping up fresh spills, it just doesn't have the chemical muscle to break down polymerized carbon.
Think of it this way: that baked-on layer is like a shield. It acts as an insulator, forcing your equipment to burn more energy just to get up to temperature. A flat-top griddle with even a thin carbon layer will develop nasty hot spots, which means you're fighting to cook food evenly. Ovens aren't immune either—carbon on the heating elements can slow down preheating times by as much as 20%, throwing a wrench in your kitchen's entire flow.
The Real Cost of Letting Carbon Build Up
Letting that heavy carbon layer stick around isn't just an eyesore; it's costing you money and creating risks.
- It kills your equipment. Carbon traps heat and moisture right against the metal, fast-tracking corrosion and wear and tear on your expensive stainless steel and cast-iron gear.
- It ruins your food. Little flakes of old carbon can break off and end up in a customer's meal, giving it a bitter, burnt flavor. That's a one-way ticket to a bad review.
- It’s a serious fire hazard. All that grease-soaked carbon is incredibly flammable. Keeping it clean isn't just good maintenance; it's a fundamental safety practice. Ensuring your whole system is up to code is just as important, which is why we've put together a guide to commercial kitchen ventilation requirements to help you stay compliant.
The line between a surface-level clean and real professional maintenance is all about using the right tool for the job. A carbon off cleaner is that tool. It keeps your equipment running efficiently, extends its lifespan, and ensures you're always ready for a surprise health inspection. Stay tuned for exclusive deals on essential supplies like this.
Your Safety and Workspace Preparation Checklist
Let's get one thing straight: using a commercial-grade carbon off cleaner is nothing like your typical end-of-shift wipe-down. We're talking about powerful, often caustic chemicals that demand respect. Before you even think about spraying, your absolute first priority is setting up a safe and controlled environment.
Think of it as your pre-flight checklist. Skipping a step isn't an option.
Gear Up and Clear the Decks
First things first, you need the right gear. Your standard food-prep gloves won't cut it here. You need heavy-duty, chemical-resistant gloves and wrap-around safety goggles. A stray splash of this stuff is no joke, and your eyes are your most valuable asset in the kitchen.
Once you’re protected, it's time to secure the area. The biggest concern with these cleaners is the fumes.
- Ventilate, Ventilate, Ventilate: Crank your kitchen's exhaust hood to its highest setting. If you have them, open any nearby windows to get the air moving. This isn't just for comfort; it's critical for pulling chemical fumes up and away from you.
- Create a Sterile Zone: Get everything out of the immediate vicinity. I mean everything—food products, utensils, cutting boards, spice racks, you name it. The risk of cross-contamination is real, and the last thing you want is cleaner residue ending up on a food-contact surface.
A Quick Note on Overall Kitchen Safety: This kind of deep cleaning is just one piece of the puzzle. For a more complete view on keeping your operation secure, it's worth reviewing documents like a comprehensive fire safety inspection checklist to ensure you're covered on all fronts.
Before you start spraying, it's helpful to have a clear plan. This checklist breaks down the essential prep work into manageable steps.
Pre-Cleaning Safety and Preparation Checklist
| Category | Action Item | Critical Reason |
|---|---|---|
| Personal Safety | Wear heavy-duty, chemical-resistant gloves. | Prevents chemical burns and skin irritation. |
| Personal Safety | Put on wrap-around safety goggles. | Protects eyes from accidental splashes. |
| Workspace Setup | Turn exhaust hood to its highest setting. | Pulls chemical fumes away from your breathing zone. |
| Workspace Setup | Remove all food, utensils, and small appliances. | Eliminates the risk of chemical cross-contamination. |
| Equipment Prep | Disconnect all electrical power sources. | Prevents electrical shock and accidental activation. |
| Equipment Prep | Turn off the gas supply for gas appliances. | Eliminates fire and explosion hazards. |
| Equipment Prep | Ensure surfaces are cool to the touch. | Avoids hazardous fumes and ensures cleaner efficacy. |
Running through this quick list before every deep clean builds a habit of safety that protects you, your staff, and your kitchen.
Prep the Equipment Itself
Finally, let's get the target equipment ready. This is where safety and effectiveness really go hand-in-hand.
For any electric equipment, unplug it completely from the wall. Don't just turn it off—disconnect it. If you're working on a gas grill or oven, shut off the gas supply line. There should be zero chance of the appliance kicking on while you're working.
Next, check the surface temperature. Never, ever apply a carbon off cleaner to a hot surface. It can create a cloud of nasty fumes and will likely just bake off before it has a chance to work. The sweet spot is warm to the touch, somewhere around 130-150°F. This slight warmth actually helps the chemicals work faster without creating a hazard. Getting the temperature right is the secret to a perfect, effortless result.
Getting the Most Out of Your Carbon Off Cleaner
When you're dealing with a serious carbon off cleaner, getting great results is less about elbow grease and more about smart technique. Just spraying and wiping won't cut it—that's a good way to waste product and end up with a half-cleaned mess. The real secret lies in picking the right application method and giving the cleaner enough time to work its magic.
Choose Your Tool: Sprayer vs. Brush
For big, flat surfaces like the inside of an oven or a stack of sheet pans, a good sprayer is the way to go. It lays down a quick, even coat that covers every inch.
But for anything with tight corners or intricate parts—think grill grates, fryer baskets, or burner heads—grab a brush. A brush lets you get the cleaner deep into all those little crevices where carbon loves to build up, making sure the formula gets direct contact with the grime.
The Art of the "Dwell Time"
If you take away one thing, let it be this: dwell time is everything. This is the period when the cleaner sits on the surface, actively dissolving those tough, baked-on carbon bonds. Cutting this step short is the number one reason people get frustrated.
Every product has a recommended time on the label, but your eyes are your best guide. Let's walk through a common kitchen nightmare: a flat-top griddle with a thick, black carbon shield.
- First Contact: You've applied the cleaner. Right now, it's just sitting on that hard, black surface.
- The Reaction Begins: After a few minutes, you'll start to see some action—maybe a little foaming or bubbling. That's the sign the chemicals are starting their attack.
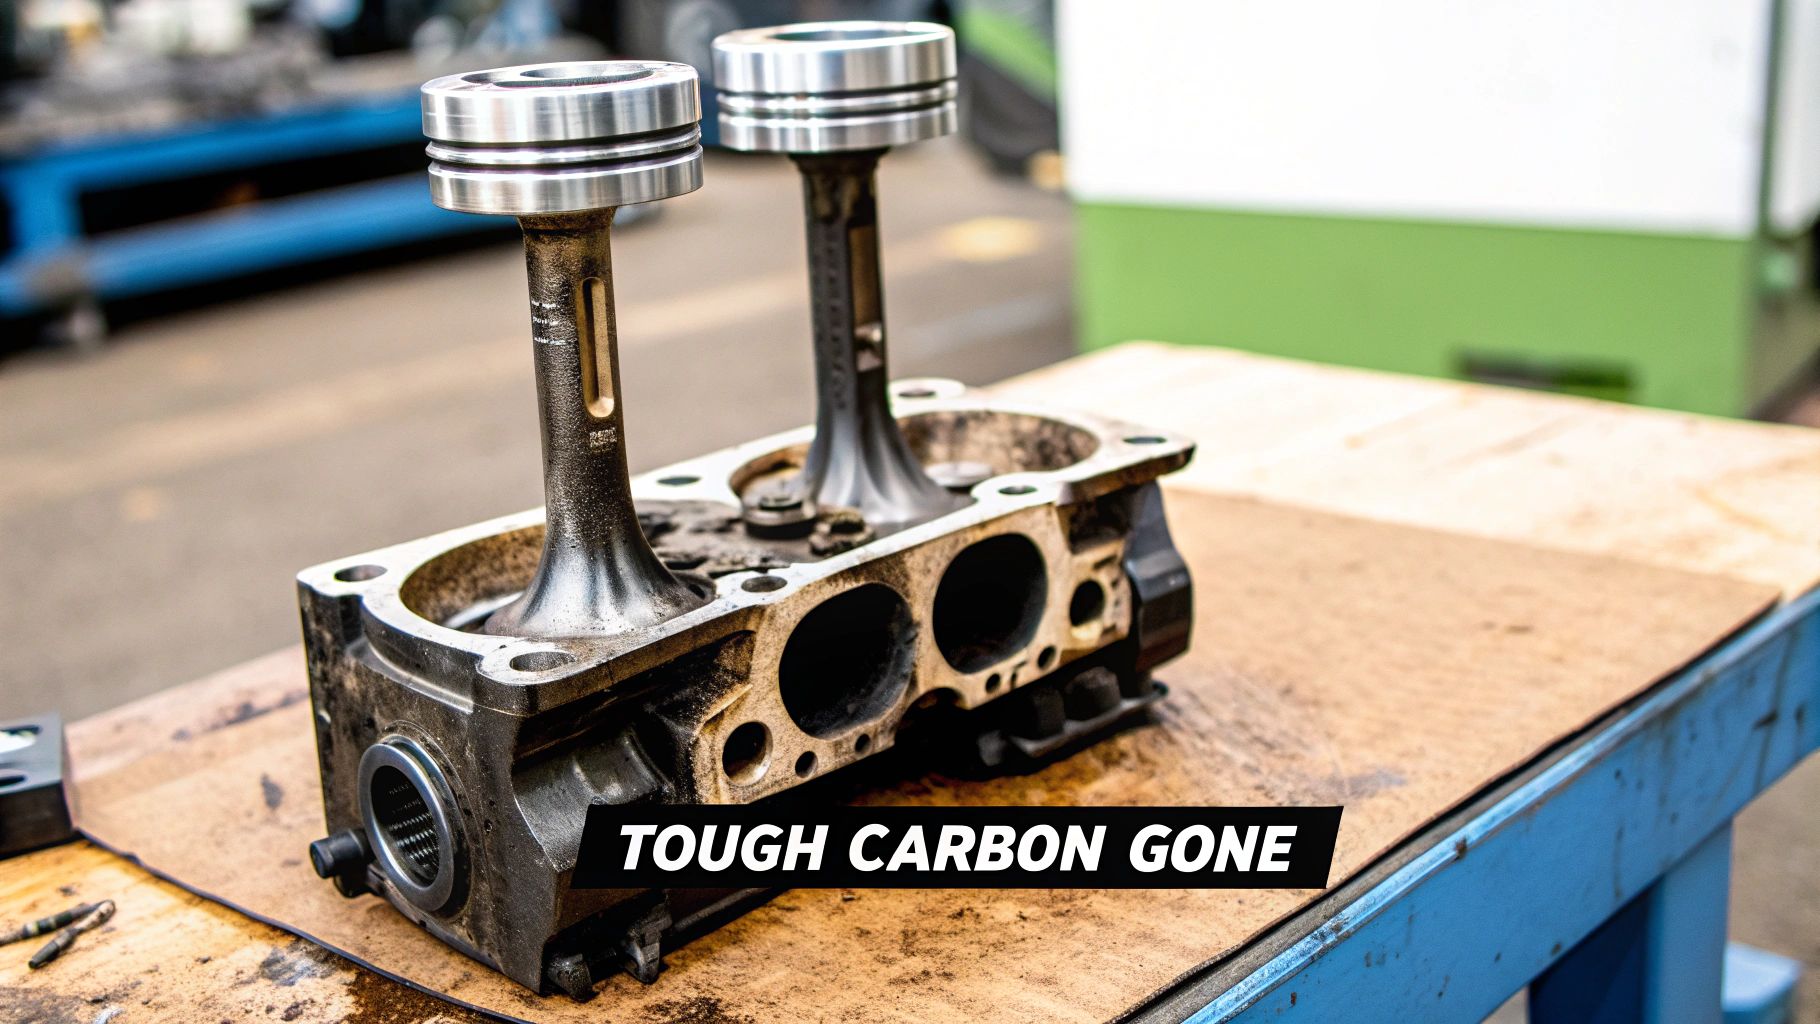
- The Telltale Sign: The real magic happens when that rock-hard carbon starts to look soft, almost like a dark, gooey gel. This is your green light. It means the cleaner has done its job breaking down the buildup. If you try to scrape before you see this change, you're just going to be fighting it.
This quick guide sums up the whole process.
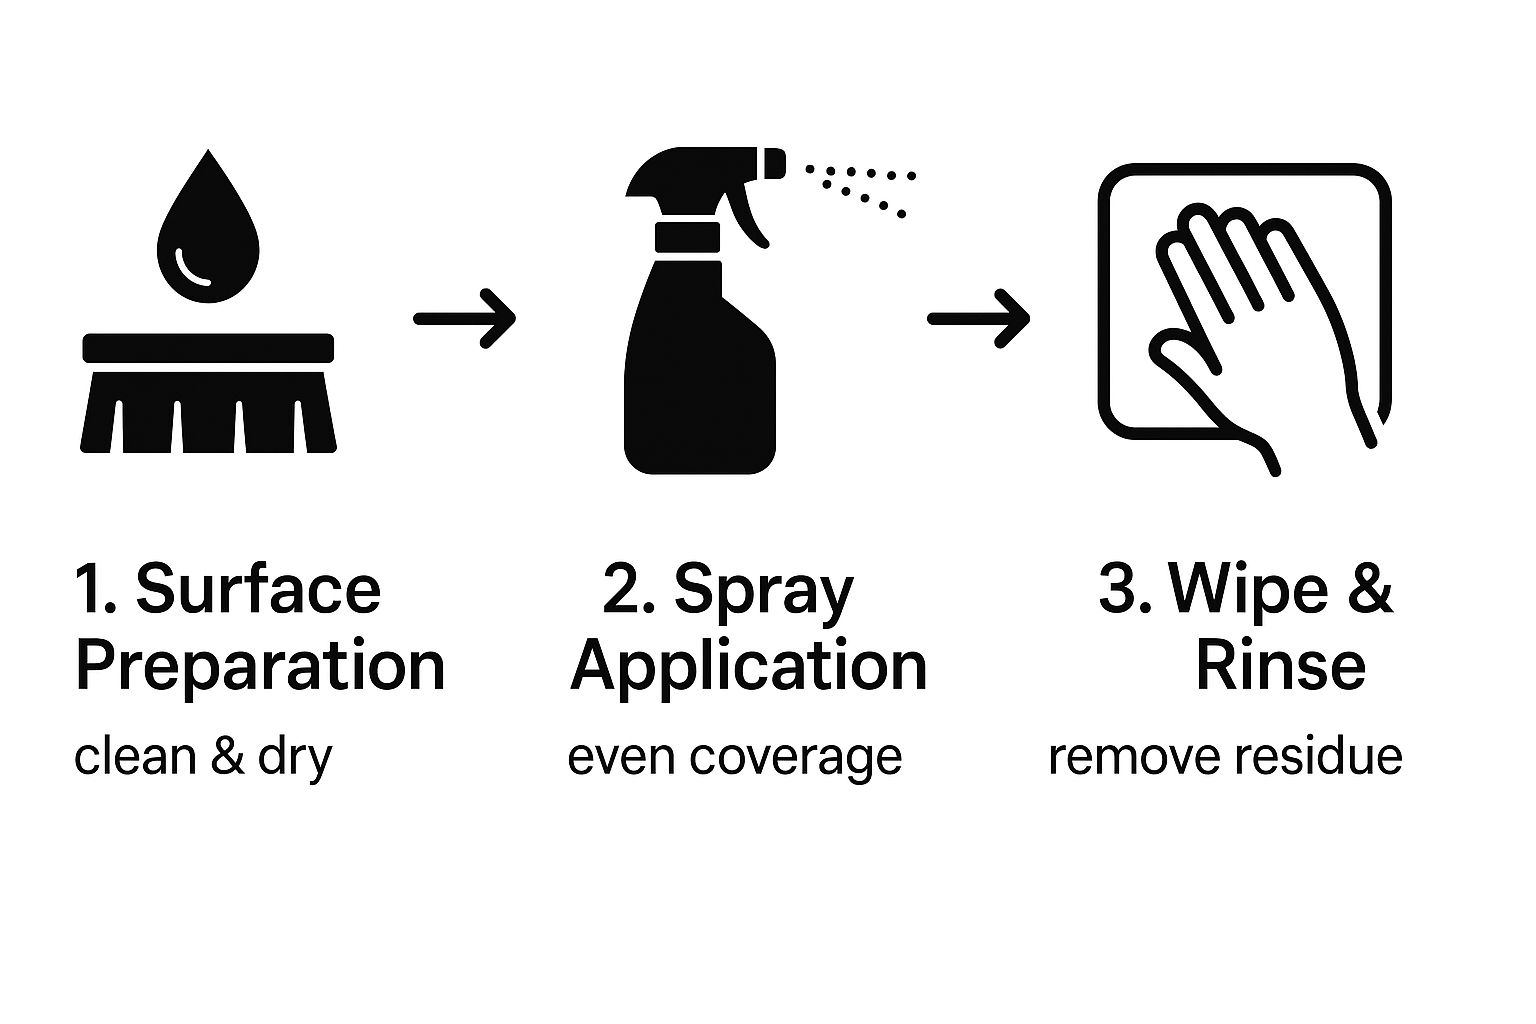
As you can see, it's not just about spraying. It starts with good prep and, just as importantly, ends with a solid rinse to get all that chemical residue off.
Look, the best tool you have here is patience. For really stubborn, layered-on carbon, don't be afraid to go for a second round. Scrape off the first layer of dissolved gunk, then hit the tough spots underneath with a fresh coat. Let the cleaner do the hard work for you, and you'll get a like-new finish without scratching up your gear.
Rinsing and Neutralizing for a Food-Safe Finish
Alright, the carbon off cleaner has done its heavy lifting and that baked-on gunk is finally loose. But don't pop the champagne just yet—the most critical part of the job is just getting started. Your equipment isn't truly clean until every last trace of that powerful chemical is gone.
First, you need to get rid of the dissolved grime. For a tough cast iron griddle or thick steel, you can go to town with a grill brick or scraper. But when you’re working with stainless steel, your go-to should always be a non-abrasive scrubbing pad. Anything harsher, like steel wool, will carve tiny scratches into the surface. These micro-grooves are the perfect hiding spot for bacteria and will make your next cleanup even harder.
You Can't Rinse Too Much
This is the one step I see people rush, and it’s a huge mistake. A quick wipe-down just won't cut it. You need to rinse the surface thoroughly, then rinse it again with clean, warm water. The goal is to flush away not just the gunk you can see, but the invisible chemical film clinging to the metal.
Think about it like this: your first rinse gets the mess off, but the second and third rinses get the cleaner off. A potent carbon remover left behind can taint the taste of your food and create a serious food safety hazard.
In a professional kitchen, there are no shortcuts when it comes to safety. Leaving even a small amount of alkaline residue on a surface can corrode the metal over time. More importantly, it's a direct risk for chemical contamination.
The Final Step: Neutralize for a Perfect Finish
To get that surface genuinely pristine and 100% food-safe, the pros take one last step: neutralization. Most carbon off cleaners are highly alkaline, so this step brings the surface pH back to neutral.
Luckily, it’s incredibly simple.
- Mix Your Solution: Just grab some white vinegar and mix a solution of one part vinegar to three parts water. The mild acid in the vinegar is all you need to neutralize the alkaline cleaner.
- Apply and Let It Sit: Wipe or spray this mixture over the entire surface you just cleaned. Let it sit for a couple of minutes to work its magic.
- One Last Rinse: Give the equipment a final, thorough rinse with fresh water and dry it completely with a clean cloth.
This final touch is your ultimate insurance policy, protecting both your equipment and your customers. This same meticulous approach is crucial for all your equipment care, which is why we also put together a guide on the best practices for using ice machine cleaners and sanitizers.
Keeping Your Kitchen Carbon-Free for the Long Haul
Blasting through months of carbon buildup with a heavy-duty cleaner feels great, but let's be honest—it's not a one-and-done solution. If you fall back into the same old habits, you'll be right back where you started in a few months.
The real secret is shifting your mindset from reactive deep cleans to proactive, consistent maintenance. Think of it as a little bit of work every day to avoid a mountain of work later. This approach not only keeps your equipment looking sharp but also extends its lifespan, saving you serious money. Following restaurant industry trends toward sustainability and efficiency starts right here with equipment care.
Building a Practical Cleaning Schedule
A solid cleaning schedule takes the guesswork out of the equation. Everyone on your team knows exactly what needs to be done and when, which is how you prevent that tough, baked-on carbon from ever getting a foothold. For a deeper dive into this, our guide on commercial kitchen equipment maintenance is a great resource.
Here’s a simple, real-world framework you can adapt for your kitchen:
- End-of-Shift Duties: This is non-negotiable. Every night, staff should wipe down all cooking surfaces—griddles, grills, fryers—with a good degreaser. This simple step removes the fresh grease that would otherwise carbonize during the next day's service.
- Weekly Resets: Once a week, go a little deeper on your workhorse equipment. This is the time for fryer boil-outs, a thorough scrubbing of grill grates, or detailing the inside of your ovens before minor spots become major problems.
- Monthly Check-Ins: Think of this as preventative maintenance. Once a month, take a close look at all your equipment. Spot any stubborn carbon starting to form? Hit those specific areas with your carbon off cleaner. A quick touch-up now saves you a massive project later.
Making this routine a core part of your kitchen's daily rhythm is the game-changer. It turns equipment care from a dreaded, all-day chore into a simple, manageable habit. That consistency is what truly keeps a kitchen sparkling clean.
It’s interesting how the principle of dealing with contaminants early applies elsewhere, too. Think about how products like activated carbon are used in water and air filters to trap impurities. The concept is the same: address the small stuff before it becomes a big issue.
Kitchen Crew FAQs
Look, I get it. No matter how many times you go over the procedures, questions always pop up in the heat of service. When you're dealing with a heavy-duty carbon off cleaner, getting the right answer fast is crucial for safety and for keeping your equipment in top shape. Here are a few things I get asked all the time by chefs and kitchen managers.
How Often Should We Be Hitting the Grill with This Stuff?
Honestly, it all comes down to how much you're using it. If your grill is running nonstop from open to close, you might need a serious deep clean with a carbon remover every month or so. If you’re a lower-volume spot, maybe quarterly is enough.
The real tell is when you start seeing that thick, black buildup that your daily degreaser just smears around. Stay on top of your regular cleaning, and you'll definitely push back the need for those big, time-consuming deep cleans.
Is This Safe to Use on Our Aluminum Sheet Pans?
That's a hard no. And this is a big one, so pay attention. Using a powerful carbon off cleaner on aluminum is a surefire way to ruin your pans.
Most of these cleaners are extremely alkaline, which means they'll eat right through soft metals like aluminum, causing pitting, ugly discoloration, and corrosion. Always, always read the label on the chemical bottle and only use products specifically made for aluminum.
What’s the first thing I should do if cleaner splashes on my skin?
Don't wait. Immediately get the area under a steady stream of cool, running water for at least 15 minutes. While you're rinsing, carefully take off any clothing that got soaked with the chemical. These are serious, caustic cleaners. After rinsing, it’s always a good idea to get a medical opinion to make sure there's no chemical burn. Keep the product's Safety Data Sheet (SDS) somewhere accessible—it has the exact first-aid steps you need to follow.
Ready to gear up your kitchen? At Encore Seattle Restaurant Equipment, we’ve got what you need to keep your line humming. We help restaurant owners and chefs discover the latest news and exclusive deals on restaurant equipment and supplies. Check out our huge selection of new and used equipment at prices you'll love over at our website.