

A Practical Guide to 3 Compartment Sink Temperature
When it comes to running a commercial kitchen, few things are as fundamental as the three-compartment sink. Getting the water temperatures right isn't just about following rules—it's the bedrock of your food safety program and a key part of staying on top of industry trends.
For the wash sink, you need a minimum temperature of 110°F (43°C). This is followed by the rinse sink, which should also be at least 110°F. Finally, the sanitize sink requires either very hot water at 171°F (77°C) for heat sanitizing or a cooler 75°F (24°C) if you're using a chemical sanitizer.
A Step-by-Step Guide to Sink Temperatures and Compliance
Navigating the regulations of a professional kitchen can sometimes feel overwhelming, but mastering your warewashing station is a simple, powerful way to ensure safety and keep things running smoothly. The three-compartment sink is more than just a piece of steel; it's a meticulously designed process that protects your patrons from foodborne illness. Each sink has a distinct role, and hitting the correct water temperature is what makes it all work.
Think of it as a production line for clean dishes, where every stage is critical. The entire system is designed to take a dirty dish and transform it into one that's not just clean, but truly sanitized and safe for the next customer.
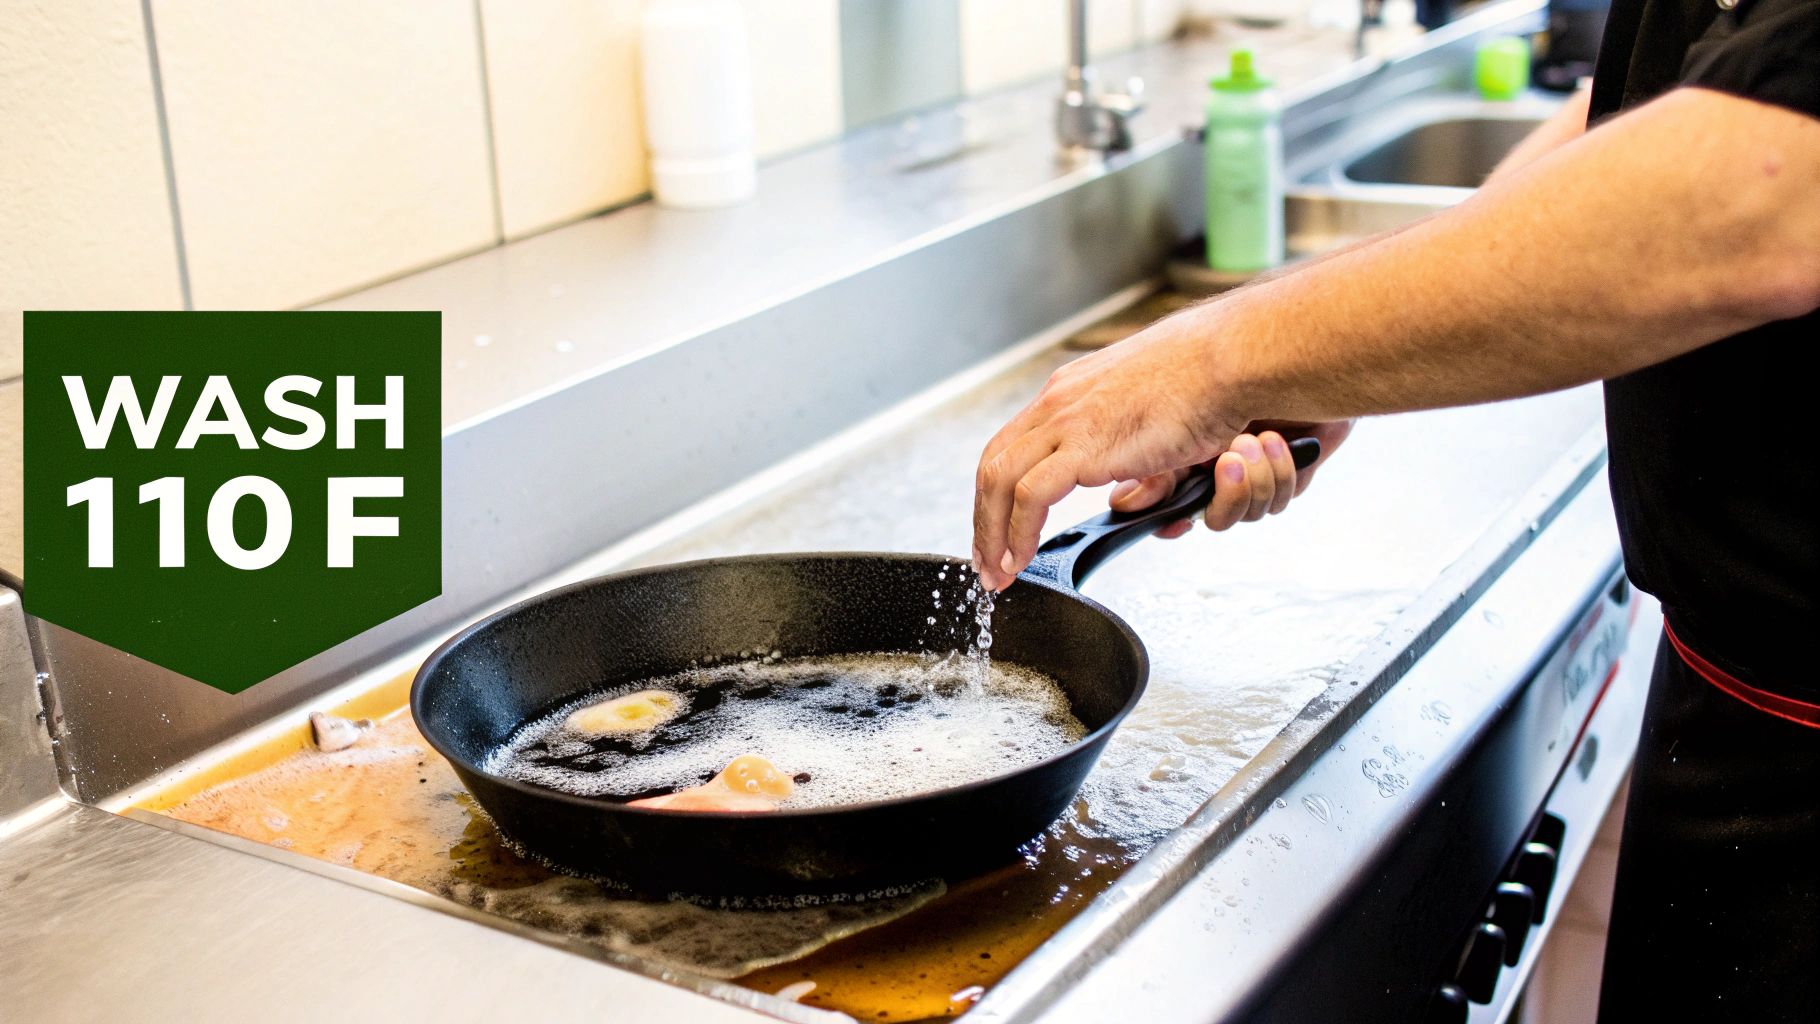
- Wash: The first compartment is where the heavy lifting happens. Hot water and a good detergent work together to cut through grease and scrub away stuck-on food.
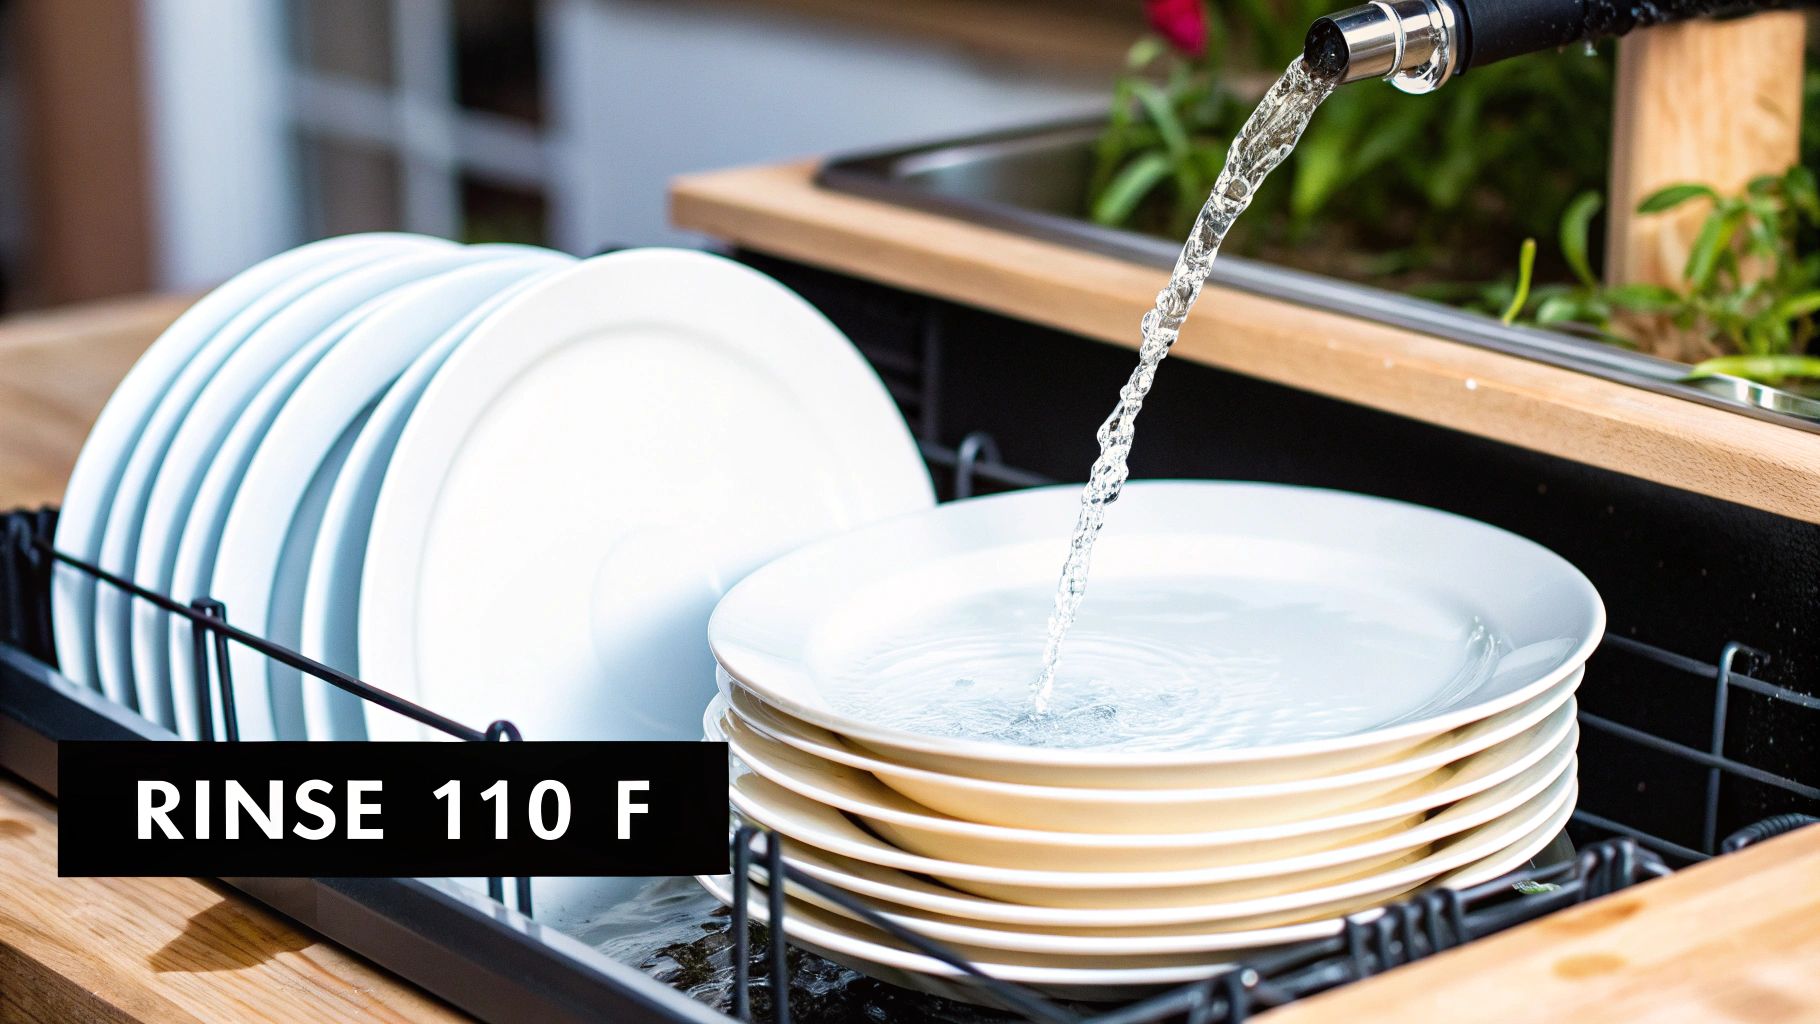
- Rinse: The middle sink’s job is simple but crucial: rinse off all the soap and suds. If you skip this or do it poorly, the leftover detergent can interfere with the sanitizer in the final step.
- Sanitize: This is the final line of defense. The third sink uses either high-heat water or a chemical solution to kill any remaining microscopic pathogens, making everything safe for reuse.
This visual guide lays out the essential temperature requirements you need to know for each step.
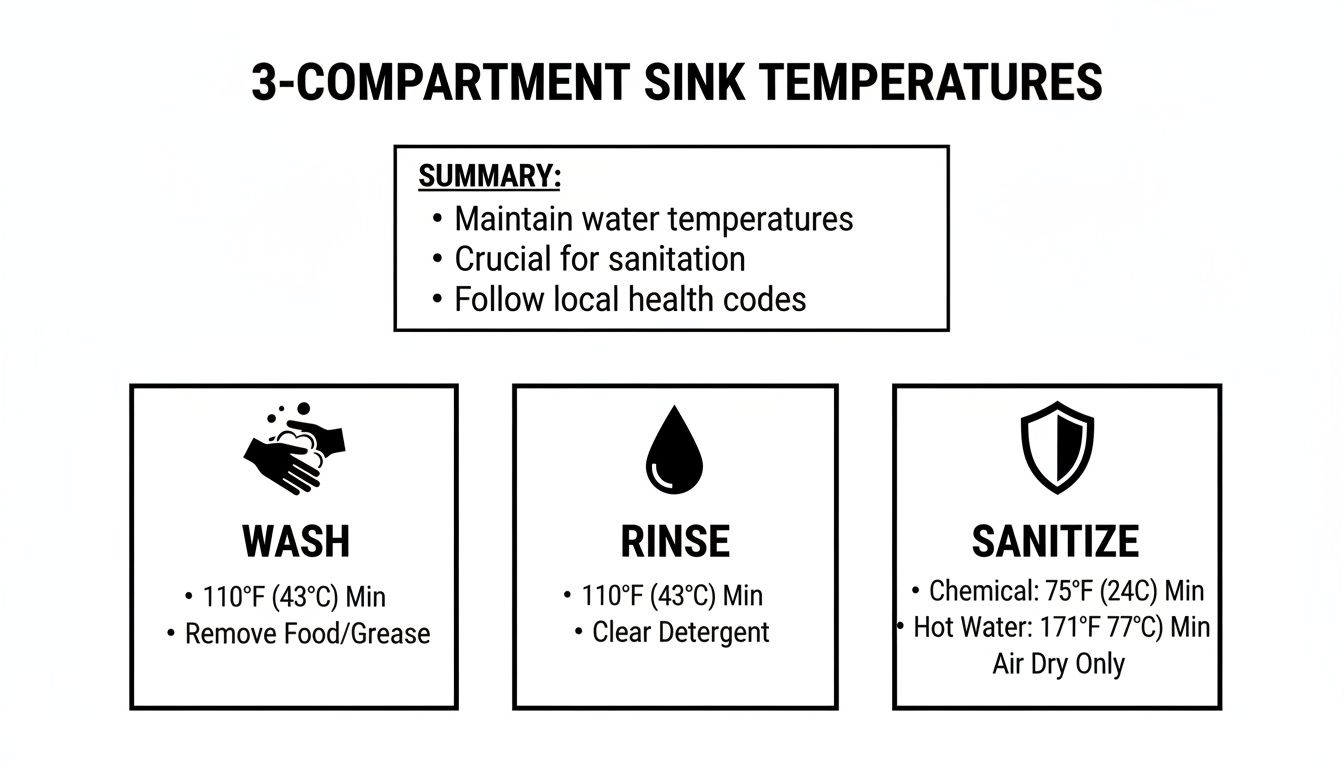
As you can see, the wash and rinse sinks share the same minimum heat requirement, while the sanitizing stage gives you a choice between a high-heat or a chemical approach.
For a great refresher on the basics, it's worth understanding the difference between cleaning and sanitizing. Following these standards is about more than just acing your next health inspection; it’s about building a culture of safety from the ground up. If you're looking for an even more detailed breakdown, our complete guide on https://encoreseattle.com/blogs/seattle-restaurant-equipment/3-compartment-sink-rules has you covered.
3 Compartment Sink Temperatures At a Glance
To make things even easier, here's a quick-reference table that summarizes the key details from the FDA Food Code. Keep this handy near your warewashing station for daily checks.
| Compartment | Primary Purpose | Required Water Temperature | Key Compliance Notes |
|---|---|---|---|
| 1: Wash | Remove food and grease | Minimum 110°F (43°C) | Use a calibrated food thermometer to check. Must use an approved detergent. |
| 2: Rinse | Remove soap residue | Minimum 110°F (43°C) | Water should be clean and clear. Prevents sanitizer from being neutralized. |
| 3: Sanitize | Kill harmful pathogens | 171°F (77°C) for heat sanitizing OR 75°F (24°C) for most chemical sanitizers | For chemical sanitizers, always check manufacturer's instructions for correct temperature & concentration. |
This table serves as a solid daily reminder for your team, helping ensure that every dish, every time, is handled correctly and safely. It's these consistent, small actions that define a well-run and safe kitchen.
The Wash Sink: Your First Line of Defense
The first compartment of your sink is where the real work happens. This is your primary attack on grease, grime, and baked-on food. Get this step right, and the rest of the process is a breeze. Get it wrong, and you're just pushing dirty water around.
Think of it as the foundation of your cleaning process. A good wash, with the right combination of hot water and detergent, breaks down the toughest messes, setting the stage for a perfect rinse and sanitize.
Why 110°F Is the Magic Number
Ever tried washing a greasy pan with cold water? It’s a losing battle. The grease just clings stubbornly to the surface. The same exact principle applies in your wash sink, which is why temperature is so critical.
The water needs to be at least 110°F (43°C). This isn't an arbitrary number; it's the sweet spot for melting fats and oils, allowing your detergent to get in there and lift them off the dishware. It's hot enough to be effective, but not so scorching that it cooks things like egg or dairy proteins onto the plate, which would make them even harder to scrub off.
This minimum temperature is a core requirement of the FDA Food Code. While 110°F is the floor, many local health codes suggest a working range of 100-120°F to balance cleaning power with employee safety. According to health inspection data, failing to maintain proper wash temperatures is one of the most frequent warewashing violations seen in U.S. restaurants. You can discover more insights about these three-compartment sink rules to stay ahead of compliance.
Key Takeaway: Hitting that 110°F minimum isn't optional—it's a food safety mandate. Maintaining this temperature consistently is a must for passing health inspections and, more importantly, keeping your customers safe.
Common Mistakes to Avoid
Even the most well-intentioned team can slip up, especially when the dinner rush hits hard. Knowing what to look out for is half the battle. Here are a few common pitfalls to watch for at the wash sink:
- Letting the Water Go Cold: As you add room-temperature dishes and time ticks by, that hot water will inevitably cool down. Your team needs to get in the habit of checking the temperature regularly with a calibrated thermometer.
- Overloading the Sink: Jamming too many dishes in at once is a classic mistake. It drops the water temperature fast and makes it impossible to scrub anything properly. There's no room for the water and detergent to circulate and do their job.
- Washing with Dirty Water: After a few racks of dishes, that once-clean water is now a soup of grease and food bits. Continuing to wash in it just redeposits grime back onto the "clean" dishes.
These simple mistakes don't just put you at risk for a health code violation; they make the next two steps—rinsing and sanitizing—almost completely useless. A great wash is what makes a great finish possible.
The Rinse Sink: Your Key to Effective Sanitation
After a good scrub in the wash sink, it’s all too easy for a busy dish crew to give plates a quick splash and move them along. But that second compartment—the rinse sink—is much more than just a quick stop. It’s the gatekeeper that stands between a soapy wash and a truly effective sanitizing bath.
If you rush or skip this step, the entire three-sink method falls apart. Think about it like painting a wall. You wouldn't just paint over dust and grime, right? You'd wipe it clean first so the paint can actually stick. Rinsing does the same for your dishes; it removes all the leftover detergent so the sanitizer can go to work on germs, not on soap bubbles.
Why Warm, Clear Water is a Must
The rinse compartment's job is to completely remove all detergent and any leftover food bits. To do this right, the water temperature needs to be at least 110°F. This isn't just a suggestion; it's a standard requirement in many health codes, and you can find more detailed compartment sink temperature guides that break this down further.
Warm water is simply better at cutting through and washing away soap residue than cold water. The goal is to send a perfectly clean, soap-free dish into the sanitizer. If the rinse water is cloudy, cool, or full of suds, you’re not rinsing—you’re just dipping dishes in dirty water.
A Critical Step in Your Food Safety Plan
In the world of food safety, we talk about critical control points—these are the make-or-break moments where you can stop a hazard dead in its tracks. The rinse sink is a classic example. If you don't rinse properly, you're introducing a chemical hazard (detergent) into the final step.
That leftover soap will instantly neutralize the sanitizer in the third bay, rendering it useless. You might think you're sanitizing, but you're really just giving germs a bath.
Pro Tip: Train your team to use their senses. If the water looks cloudy, has suds floating on top, or if a plate still feels a little slick and soapy after a dip, it’s time to drain and refill. A thorough rinse is non-negotiable for real sanitation.
Keep an eye out for these clear red flags. If you spot any of them, the rinse water needs to be changed immediately:
- Visible Suds: This is the most obvious sign. If you can see foam, the water is saturated with soap.
- Cloudy Water: The water should be clear. Murky water means it's full of detergent and food particles.
- Slippery Dishes: Run a gloved finger over a rinsed plate. If it feels slick, there’s still soap residue on it.
Giving the rinse sink the respect it deserves is crucial. It ensures the whole system works, protects your guests, and keeps your kitchen up to code.
The Sanitize Sink: Your Final Line of Defense
After all the washing and rinsing, that third sink is where the real magic happens. This is your final, non-negotiable step to guarantee every plate, fork, and pan is safe for your guests. It’s the part of the process health inspectors zero in on, because this is what separates a clean dish from a sanitized one.
You have two ways to get the job done: bring the heat or use a chemical solution. Both are approved, but each has its own strict set of rules you absolutely have to follow.

High-Temperature Sanitizing
The first route is simple in concept but intense in practice: using scalding hot water. To pull this off, the water in your sanitize sink needs to be at a blistering 171°F (77°C). That’s not a ballpark figure—it's the minimum temperature required to kill off any nasty microbes left behind.
Once the water is hot enough, every item must be completely submerged for at least 30 seconds. This combo of intense heat and time is what annihilates any lingering pathogens. It's a powerful method, but it usually requires a booster heater to maintain that temperature and demands serious caution from your team to avoid burns.
Chemical Sanitizing Options
The more common approach, and one that's kinder to your utility bills, is using a chemical sanitizer. Unlike the high-heat method, chemical sanitizers work their best in lukewarm water, right around 75°F (24°C). If the water gets too hot, the chemicals can actually start to evaporate, which weakens their sanitizing power and can even release fumes.
In most kitchens, you'll find one of three types of approved chemical sanitizers. Each one has a specific concentration range, measured in parts per million (PPM), that you have to nail.
- Chlorine (Bleach): This is the old standby. Keep its concentration between 50 and 100 PPM.
- Quaternary Ammonium (Quat): A popular choice, quat solutions typically require a concentration of 200 PPM, but you should always double-check the manufacturer's label.
- Iodine: Less common but still effective, iodine needs to be maintained between 12.5 and 25 PPM.
Whether you're using heat or chemicals, the 2017 FDA Food Code is crystal clear on the requirements. For heat, it's that 171°F minimum for 30 seconds. For chemicals, it's hitting those PPM targets in 75°F water. It's not just about compliance; it's about public safety.
The Golden Rule: Test, Don't Guess.
Never just assume your sanitizer solution is mixed correctly. The only way to be certain is by testing it. Use the right chemical test strips for your chosen sanitizer and check the water frequently throughout every shift.
When you're working with chemicals like bleach, knowing how to dilute them properly is crucial. Checking the Sodium Hypochlorite Solution SDS (Safety Data Sheet) is a must for both safety and effectiveness.
At the end of the day, it doesn't matter if you choose heat or chemicals. What matters is diligent, consistent monitoring. A calibrated thermometer and the correct test strips are your best friends in ensuring this final, critical step is done right every single time.
How to Measure and Document Temperatures Correctly
Knowing the temperature rules is one thing, but proving you're following them is another. To keep food safe and pass health inspections with flying colors, your team needs a solid routine for measuring and logging the numbers.
Think of it like keeping a captain's log on a ship. This record isn't just for show; it’s your proof that you’re running a tight, safe operation. It can be your best friend when an inspector walks through the door.
Arming Your Team with the Right Tools
You can't eyeball food safety. Getting accurate readings means having the right tools in your kitchen's arsenal and making sure everyone knows how to use them. These aren't optional—they're essential.
-
Calibrated Digital Thermometer: A good probe thermometer is your go-to for checking the water temperature in each sink. But it's only as good as its last calibration. You need to check it regularly to make sure the readings are spot-on. The principles are similar to how you would calibrate oven thermometer accuracy.
-
Chemical Test Strips: If you’re using chemical sanitizers, you absolutely need the right test strips for the job—whether it's chlorine, quat, or iodine. These little strips are the only way to know for sure that your sanitizer solution is strong enough to kill germs but not so strong that it's unsafe.
These two simple tools are how you get a clear, accurate picture of your 3 compartment sink temperature and sanitizer strength at any given moment.
A Simple Daily Logging Process
The secret to consistency is a simple, repeatable system. A basic log sheet posted right by the sink is the easiest way to make this happen. When the chart is right there, staff are far more likely to fill it out.
Make sure your daily log has columns for the essentials:
- Date and Time: So you know exactly when the check happened.
- Wash Sink Temp (°F): The temperature of the first compartment.
- Rinse Sink Temp (°F): The temperature of the middle compartment.
- Sanitizer Type & PPM: The chemical you're using and its measured concentration.
- Employee Initials: This creates accountability and shows who did the check.
By building these checks into your opening, mid-shift, and closing procedures, you create an undeniable record of your commitment to safety. This log tells a health inspector that your protocols are real, everyday actions, not just words in a manual.
This small habit turns compliance from a stressful, last-minute scramble into a predictable part of your daily rhythm.
Troubleshooting Common Sink Temperature Problems
Even the best-run kitchens run into hiccups. When you're in the middle of a dinner rush, the last thing you need is a problem with your warewashing station. Getting on top of issues with your 3-compartment sink temperature isn't just about avoiding a slowdown—it's a critical food safety step.
Think of this section as your quick-reference guide for diagnosing and fixing the most common problems that can throw your dishwashing process off track.
Problem: Water Is Not Getting Hot Enough
You’ve got the tap cranked, but the water in your wash sink just won't climb to that essential 110°F mark. This is a classic problem that can bring your entire cleaning process to a grinding halt.
Before you do anything else, head to your commercial water heater. Is the thermostat set high enough? Remember, you'll lose some heat as the water travels through the pipes, so you need to account for that drop. If the heater's settings look right, the issue might be more complex. Knowing the signs that you need professional help is key to preventing bigger headaches, so check out our guide on when to call for commercial kitchen equipment maintenance.
Problem: Dishes Still Feel Greasy After Washing
Your team is scrubbing, but plates and pans are still coming out with that stubborn greasy film. Nine times out of ten, the root of this problem is in the first compartment: the wash sink.
First, confirm the water temperature is hitting at least 110°F. Cold or lukewarm water simply can't cut through grease effectively. Next, take a look at your detergent concentration. Are you using enough soap to handle the greasy load? Finally, make sure the sink isn't overloaded and that your team is changing the water as soon as it gets cloudy or visibly dirty.
Expert Tip: A greasy film is more than just an annoyance; it's a clear signal that your entire system is compromised. That grease gets carried over, contaminating your rinse and sanitizer sinks and making the whole process useless. Refresh the wash water and double-check your fundamentals immediately.
Problem: Sanitizer Tests Are Weak
You dip a test strip into the third sink, and the reading comes back way below the required concentration. This is a major health code red flag and puts your customers at risk.
Let's look at the usual suspects and how to fix them:
- Improper Dilution: This is the most common culprit. Someone simply got the water-to-chemical ratio wrong. The only fix is to drain the sink and start over, carefully following the manufacturer's instructions to the letter.
- Detergent Carryover: If soap suds from the wash sink make their way into the sanitize compartment, they can neutralize the sanitizer. This is why a thorough rinse is so important.
- Water Temperature: Chemical sanitizers have a "Goldilocks" temperature. They work best in 75°F water. If your water is too hot, it can actually cause the active ingredients to evaporate, leaving you with a weakened, ineffective solution.
Answering Your Top 3-Compartment Sink Questions
Even the most seasoned kitchen crews run into questions when the lunch rush hits. Let's tackle some of the most common things managers and staff ask about keeping their 3-compartment sink setup running smoothly and up to code.
How Often Should I Change The Water In Each Sink?
The standard rule of thumb is to change the water in all three compartments at least every four hours. But that's just a baseline. The real answer? Change it whenever it's no longer doing its job effectively.
Think of it this way: if the water looks gross, it probably is. You'll need to swap it out much sooner if it gets visibly dirty, greasy, or cloudy.
Here are a few specific tells for each compartment:
- Wash Sink: The moment the soap suds are gone, it's time for a change. No suds mean the detergent is spent.
- Rinse Sink: If you see soap bubbles carrying over from the wash sink, the rinse water is contaminated and needs to be replaced.
- Sanitize Sink: Change this water immediately if you see food debris floating around or if your test strips show the sanitizer concentration has dropped below the required level.
In a busy kitchen, you might find yourself changing the water as often as every one to two hours. It all comes down to volume and what you're washing.
Can I Just Use A Commercial Dishwasher Instead?
A high-temp commercial dishwasher is a fantastic workhorse, but it doesn't get you a pass on having a 3-compartment sink. Nearly every health department in the country will still require you to have a fully functional 3-compartment sink on-site.
Why? It serves two critical functions. First, it's the only way to properly wash bulky items that won't fit in a standard dish machine—think large stockpots, sheet pans, and mixing bowls. Second, it's your backup plan. If your dishwasher breaks down mid-shift, the sink ensures you can keep washing and stay in business.
The bottom line: View your 3-compartment sink as a non-negotiable safety net. It handles the big stuff and saves the day when technology fails.
What’s The Right Way To Air-Dry Everything?
This step is just as important as the first three. After items leave the sanitizer, they must be air-dried. Whatever you do, don't grab a towel. Towel-drying is one of the fastest ways to re-contaminate a perfectly clean surface with bacteria.
The correct method is to place all your freshly washed dishes, utensils, and glassware on a clean and sanitized drainboard or wire rack. You want to make sure air can circulate freely around every surface, which is why wire racks are such a great option.
Position your drying rack away from splashes and other potential contaminants, like a food prep area or a trash can, to ensure everything dries thoroughly and safely.
From setting up the perfect warewashing station to outfitting your entire kitchen, Encore Seattle Restaurant Equipment provides top-tier brands and the practical advice you need to stay efficient and compliant. Discover the latest industry news, exclusive deals, and essential supplies to keep your restaurant ahead of the curve. Explore our extensive inventory today.