

A Pro Guide to Bread Rack Shelving
Bread rack shelving is the unsung hero of any commercial kitchen or bakery. These racks are your go-to for everything from cooling freshly baked loaves to proofing dough and moving sheet pans around with ease. Think of them as vertical real estate, designed to maximize your space and streamline your workflow. Getting the right one is all about striking that perfect balance between durable materials and your kitchen's daily operational demands. Staying informed on the latest equipment trends and deals is key to outfitting your operation for success.
How to Choose the Right Bread Rack Shelving
Picking out a bread rack isn't just about finding a place to stash your pans. It's a critical decision that impacts your kitchen's entire rhythm—from how fast you can work to the safety and quality of your food. The right rack can make your production line sing; the wrong one will just create logjams and headaches. Let's dig into what separates a decent rack from a truly great one and explore the industry trends shaping modern kitchens.
The demand for this kind of equipment is massive for a reason. The global storage rack market, which absolutely includes specialized bread rack shelving, was pegged at a cool USD 22.4 billion in 2024 and is still climbing. Here in the U.S., the market hit USD 4.8 billion in 2024, largely because every commercial kitchen and food supplier is desperate for smart, space-saving storage. This just goes to show how much value operators place on quality shelving that actually improves workflow and food safety.
Mobile vs. Stationary Racks
First up, do you need your rack to move or stay put?
Mobile racks are built on casters (wheels) and are an absolute must-have for a busy, fast-paced kitchen. Picture this: you pull a rack loaded with croissants straight from the proofer and roll it right over to the oven. No heavy lifting, no awkward shuffling of individual pans. This kind of mobility is a game-changer, saving precious time and cutting down the risk of dropping anything during a chaotic service.
Then you have stationary racks. These are your best bet for fixed storage zones. If you have a dedicated spot for cooling bread or holding prepped ingredients in a walk-in, a stationary unit gives you unmatched stability. They don't have to deal with the stress of being rolled around, so they can often handle a bit more weight.
End-Load vs. Side-Load Designs
Next, think about how you'll get pans in and out.
End-load racks are the industry standard. You slide your sheet pans in from the narrow end, which makes them incredibly space-efficient. Their smaller footprint means you can tuck them into tight corners or line them up neatly against a wall without hogging valuable floor space.
On the other hand, side-load racks have you load pans from the long side. They definitely take up more room, but the trade-off is much easier access. This is a huge plus for heavy items or delicate pastries because you don't have to reach so far back. You’ll often see these in high-volume bakeries where speed and easy access are top priorities. For more smart ways to organize your space, take a look at our guide on commercial kitchen storage solutions.
Expert Tip: Take a hard look at your kitchen’s layout. If you’re working with long, narrow walkways, end-load racks are your best friend. But if you have a more open production area, the sheer convenience of a side-load rack might be worth sacrificing the extra square footage.
Material Matters: Stainless Steel, Aluminum, and Polymer
The material your rack is made from will dictate its lifespan, weight, and where you can use it. Each one has its own strengths.
Making sense of the options is key. You don't want an aluminum rack in a high-moisture environment or a heavy stainless steel one if your team has to move it constantly.
Here’s a quick breakdown to help you compare:
Comparing Bread Rack Shelving Materials
| Material | Best For | Pros | Cons |
|---|---|---|---|
| Stainless Steel | All-purpose use, hot/cold environments, strict hygiene areas | Extremely durable, corrosion-resistant, easy to sanitize, NSF-certified | Heavier, more expensive upfront |
| Aluminum | Mobile applications, general cooling, dry storage | Lightweight, affordable, easy to maneuver | Less durable, can dent more easily than steel |
| Polymer Composites | High-moisture areas (proofing rooms, walk-ins, dish pits) | Completely rust-proof, corrosion-resistant, lightweight | Lower temperature tolerance, can be less rigid |
Ultimately, stainless steel is the top-tier choice for its rugged durability and food-safe properties—it’s a favorite of health inspectors for a reason. Aluminum is the go-to for mobility and affordability, perfect for zipping around the kitchen. And polymer composites shine in specialty situations where rust is a major concern.
Choosing the right material isn't about finding the "best" one, but the best one for a specific job in your kitchen.
Figuring Out How Many Racks You Actually Need
Picking the right size for your bread rack shelving isn't something you can just eyeball. It's a hard calculation that, if you get it wrong, will cause headaches for years. Go too big, and you've just wasted a ton of valuable kitchen space. Go too small, and you'll end up with overflowing racks and damaged goods from risky pan-stacking. Let's get it right the first time.
First thing's first: grab a tape measure. You need to know exactly what footprint you have to work with. But don't just measure the empty corner. Think about how your team moves. You need clear pathways, especially when someone is rolling a fully loaded, hot rack out of the oven area. The industry standard, and just a good common-sense rule, is to keep at least 36 inches of clearance in your main walkways.
From Pan Count to Rack Count
Once you know your physical boundaries, it's time to translate your daily output into a concrete number of racks. The math is simple, but it all starts with the humble sheet pan.
Figure out how many pans you use on your busiest day. I mean every pan—for baking, proofing, cooling, and staging. That number is the baseline for everything else.
Let's say you run a small café that churns out pastries and scones every morning. You might go through 40 half-size sheet pans before noon. Since a standard half-size mobile rack holds about 20 pans, you know you need at least two of them just to keep the morning rush from turning into a chaotic mess of hot pans with nowhere to go.
This little visual guide hits the nail on the head, showing how your kitchen's environment, the rack's material, and its design all have to work together.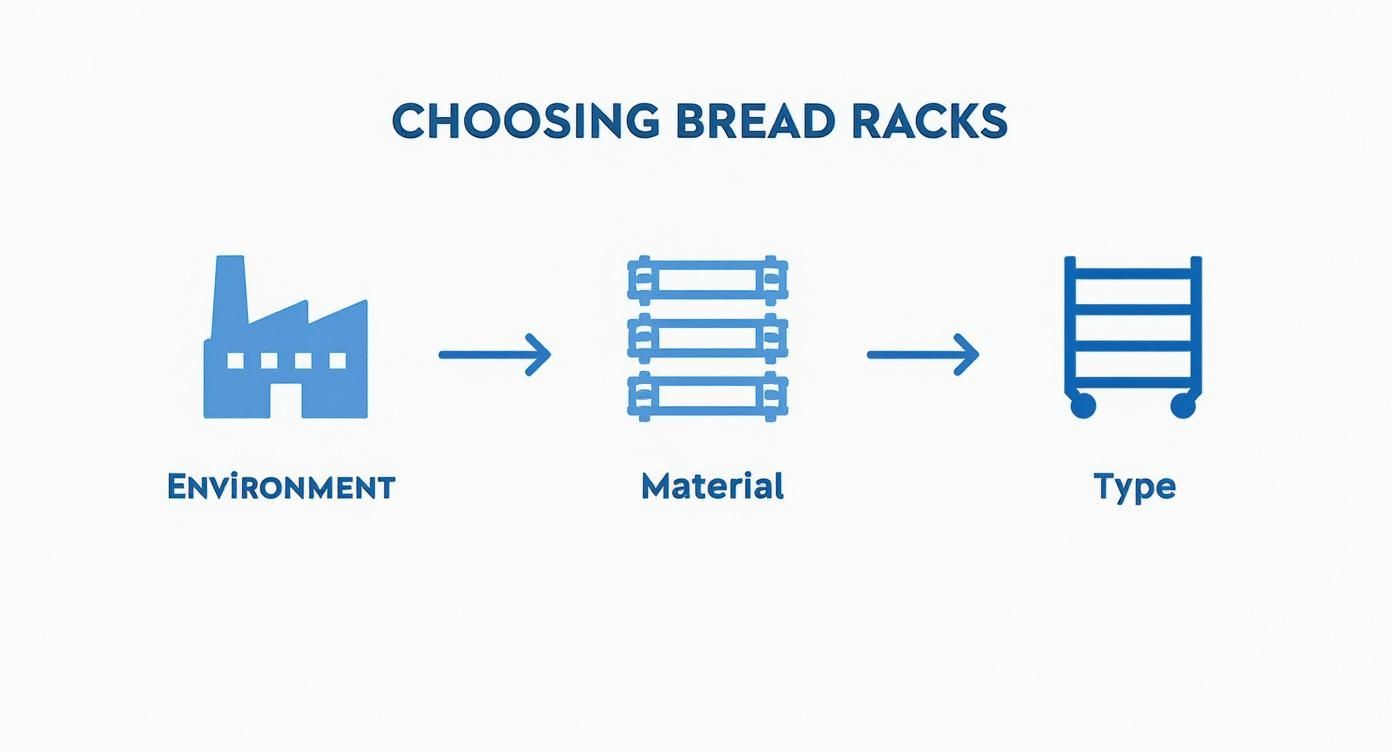
It's really a balancing act between the space you have, what the rack is made of, and what you need it to do.
Scaling for High-Volume Production
Now, let's look at a bigger operation, like a commercial bakery supplying bread to local restaurants. They might be using 200 full-size sheet pans a day. A heavy-duty, end-load rack can usually handle 20 of those pans. The math is straightforward: 200 pans / 20 pans per rack means they need a minimum of 10 racks just to get through a single day's bake.
Pro Tip: Don't just buy for today. Think about where you'll be in a year. If you plan on growing, add 15-20% more rack capacity to your order. It’s a small extra cost now that will save you from a massive storage crisis later.
This kind of forward-thinking is a cornerstone of smart kitchen management. If you want to get deeper into optimizing your whole operation, checking out some of the top retail inventory management best practices is a great move. The same principles for managing ingredients apply directly to managing your equipment.
Don't Forget Airflow and Product Height
Your calculation isn't done yet. Capacity isn't just about how many pans a rack can hold; it's also about what you're putting on them.
- Air Circulation: This is a big one. To get that perfect crust, bread needs to cool with air circulating all around it. That often means you can only use every other slot on the rack, which instantly cuts its usable capacity in half for cooling tasks.
- Product Height: There's a huge difference between flat cookies and a high-rising brioche. Most racks have about 3 inches of space between the runners, but if your products are taller, you'll need racks with 5-inch spacing or even adjustable slides.
By thinking through your kitchen's layout, your daily pan usage, and the specific quirks of your products, you can nail down your capacity needs with real precision. It takes the guesswork out of the equation and makes sure your new shelving is a workhorse, not a roadblock.
Smart Layout and Installation for a Better Workflow
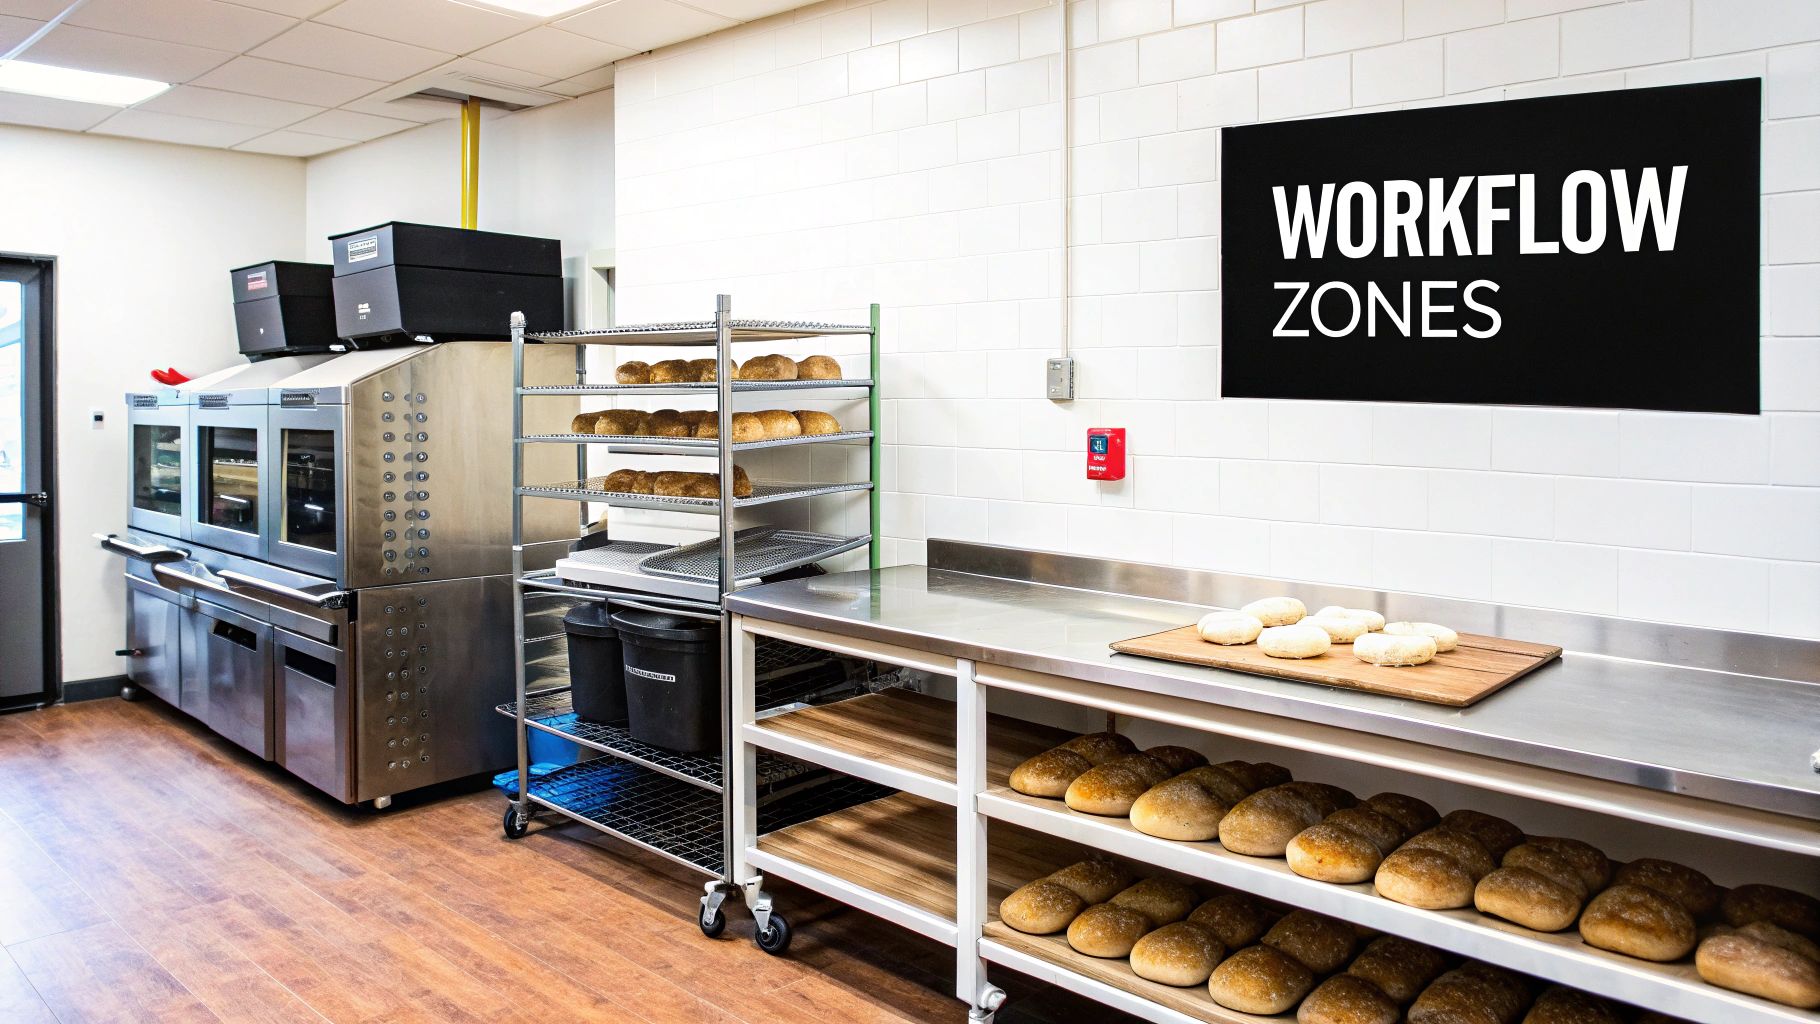
Where you decide to put your bread rack shelving can be the difference between a smooth, profitable day and a chaotic, stressful one. It’s about so much more than just finding an empty spot. The key is to strategically integrate these racks right into your kitchen's natural flow. Get it right, and you'll see less wasted motion, reduced physical strain on your team, and a real boost in production speed.
The ultimate goal is to create a seamless path for your products, all the way from raw dough to finished goods. This means setting up logical zones for each stage of the process—proofing, baking, cooling, and storage. Think of it like a production line where each rack has a specific job in a specific place, cutting down on all those unnecessary footsteps.
This kind of efficient layout is a massive driver in the industry. The global market for commercial baking rack ovens, which are the perfect partners for bread racks, was valued at around USD 258.5 million in 2025 and is projected to hit USD 364.6 million by 2035. That growth is fueled by kitchens demanding smart systems where efficient shelving and high-capacity ovens work together to create uniform quality and maximize every square foot. You can see more on these trends in industry research on commercial baking equipment.
Mapping Out Your Workflow Zones
Before you even think about grabbing a wrench, grab a pencil and paper and map out your kitchen. The best layouts follow the natural progression of your product. A simple loop or a straight-line flow is often most effective, as it prevents staff from backtracking or bumping into each other.
- Proofing Zone: This area needs to be right next to your mixers and prep tables. Mobile racks are your best friend here—you can load pans of dough and just roll them straight into a proofer or a designated warm spot.
- Baking Zone: Position your racks near the ovens for lightning-fast loading and unloading. This is usually the busiest spot in the kitchen, so leave plenty of clearance for oven doors to swing wide open and for staff to safely maneuver hot racks.
- Cooling Zone: This should be a dedicated area away from the intense heat of the ovens but with good air circulation. Never push racks right up against a wall; it traps heat and moisture, which is a surefire way to get soggy products.
- Finishing & Storage Zone: Once everything is cool, products move here for glazing, packaging, or storage. This zone should be right next to your shipping area or your front-of-house display cases for easy access.
If you’re starting from scratch or doing a major overhaul, our guide on commercial kitchen design and layout has a ton of great information on creating a truly efficient workspace.
Assembling and Installing Racks for Stability
Proper assembly isn't just a one-and-done task; it’s a critical safety measure. I've seen it happen—a wobbly rack is a serious hazard, especially when it’s loaded down with hundreds of pounds of hot bread.
When it comes to mobile racks, the casters are everything. Make sure you tighten them securely with the right tools, not just by hand. A pro tip is to check that the locking casters are installed on the front. This makes it so much easier to quickly lock the rack in place when you need to.
Safety First Takeaway: Always load your bread rack shelving evenly, starting from the bottom shelves and working your way up. This lowers the center of gravity and dramatically reduces the risk of the rack becoming top-heavy and tipping over, especially when you're rolling it around a tight corner or over an uneven floor.
For stationary racks, they have to be perfectly level. Use a level during installation and adjust the feet until it's spot-on. An uneven rack puts constant stress on the frame and welds, which will cause it to fail much sooner than it should. If you're putting a stationary rack in a walk-in cooler, also make sure its feet won't tear up the flooring over time.
Finally, always follow your local health code requirements for placement. Most regulations will require shelving to be at least six inches off the floor and a few inches away from walls. This isn't just red tape—this spacing is crucial for preventing pests from finding a hiding spot and makes it possible to properly clean underneath and behind the units.
Keeping Your Racks Clean and Well Maintained
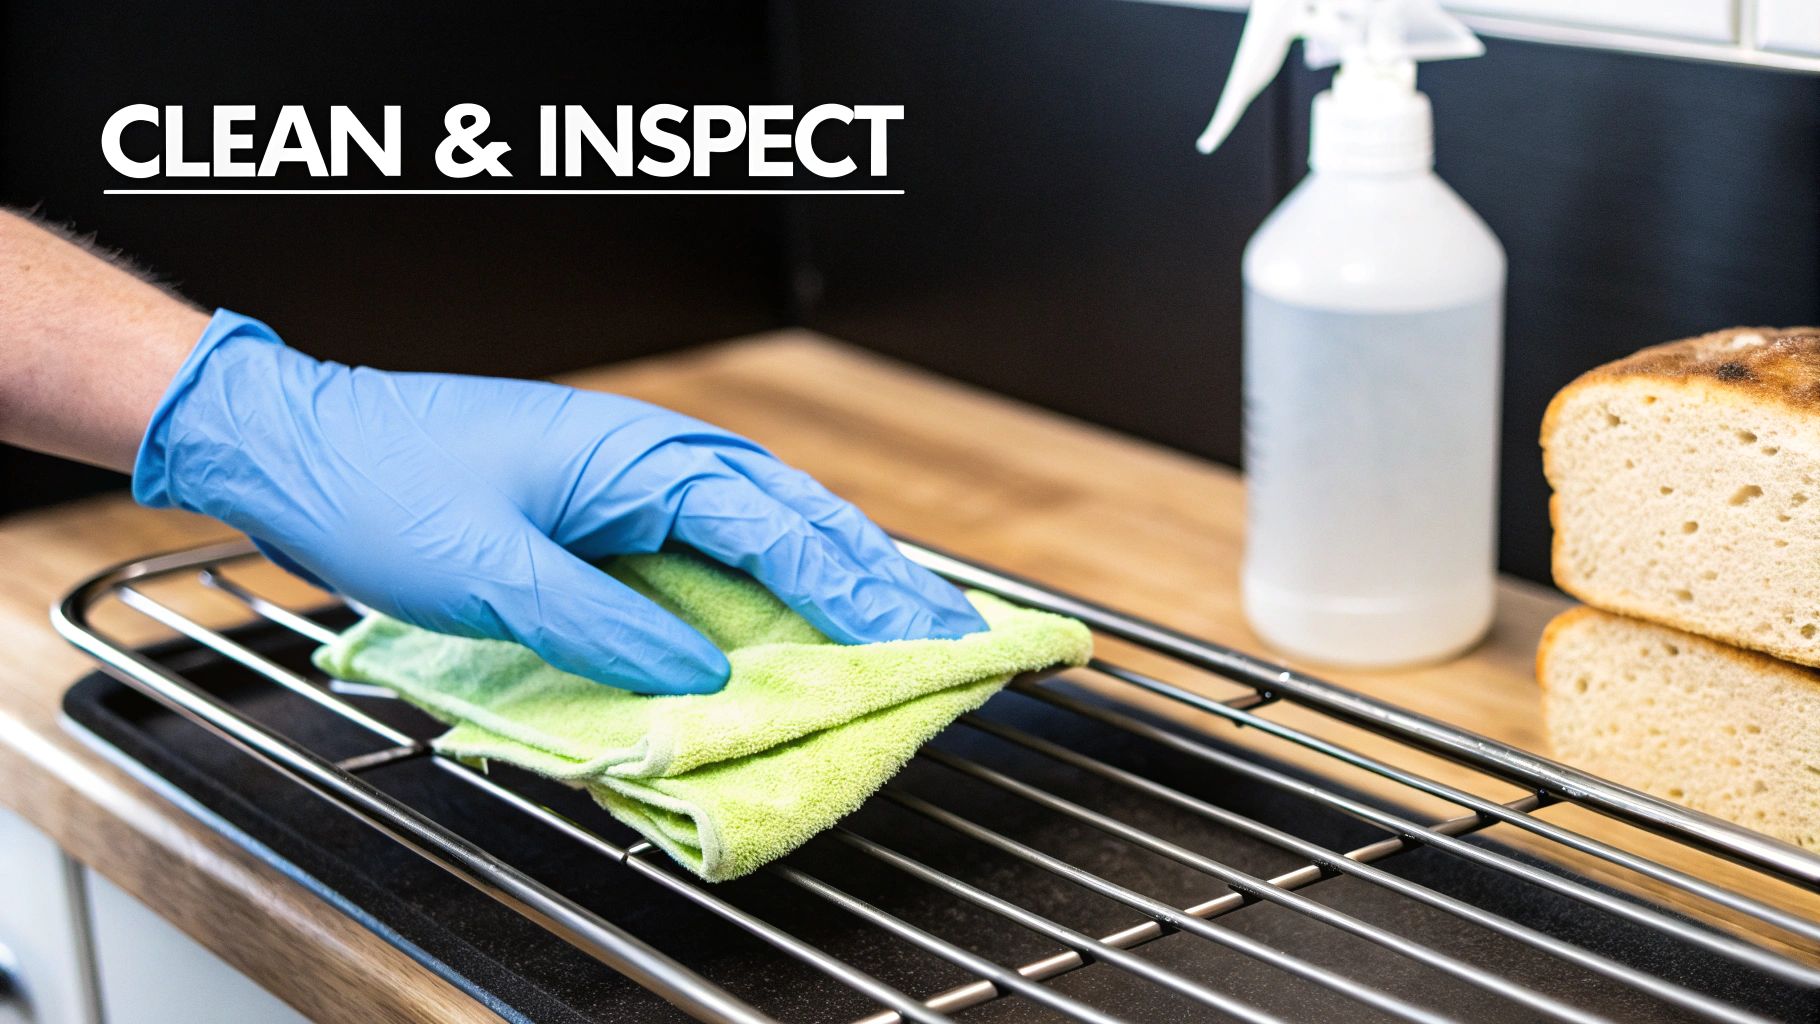
Let's be honest, your bread rack shelving is a workhorse. It's constantly in contact with food, from raw dough to finished product, which means keeping it spotless is non-negotiable. This isn't just about passing a health inspection—it's about protecting your customers and your hard-earned reputation.
The best way to tackle this is with a two-pronged approach: a quick daily wipe-down and a more thorough weekly deep clean. This simple rhythm prevents grime from building up, turning a potentially massive chore into a series of small, manageable tasks. A clean rack is a safe rack, and a well-maintained one will last you for years.
Your Daily and Weekly Cleaning Playbook
Consistency is the name of the game here. When you build these cleaning habits into your opening or closing routines, your racks will always be ready for service and you'll never have to scramble when an inspector walks in.
The 5-Minute Daily Wipe-Down:
- Brush It Off: At the end of a shift, grab a dry cloth or soft brush and knock off all the loose flour, crumbs, and dried-on bits.
- Spot Clean: Use a damp cloth and a bit of mild, food-safe detergent to hit any spills or sticky areas. Pay extra attention to the runners where the pans slide—that's where gunk loves to hide.
- Sanitize Touchpoints: Give the handles and any other high-touch parts of the frame a quick spray and wipe with a food-safe sanitizer.
The 20-Minute Weekly Deep Clean:
- Strip it Down: Get every single pan off the rack. It's the only way you're going to reach every nook and cranny.
- Scrub and Rinse: Use warm, soapy water and a non-abrasive pad to wash the entire thing—frame, shelves, and especially the casters. Then, rinse it thoroughly with clean water to get rid of any soap residue.
- Sanitize and Air Dry: Coat the entire rack with a food-grade sanitizer, following the product's directions for contact time. Just let it air dry completely before you start loading it up again.
What the Health Inspector Sees: An inspector isn't looking for perfection, but they are looking for accumulation. A little flour dust from the day's work is one thing. Caked-on grease and old food debris stuck in the caster wheels? That’s a major red flag that points to a systemic problem.
Choosing the Right Cleaners for the Job
Don't just grab any bottle from under the sink. Using the wrong chemical can do some real damage to your racks, especially depending on what they're made of.
For Stainless Steel:
- What to Use: Mild detergents or specialized stainless steel cleaners are your best bet. When it's time to sanitize, a quaternary ammonium compound (often called a "quat") is perfect because it's effective and won't cause corrosion.
- What to Avoid: Keep anything with chlorides (like bleach), bromides, or iodides far away. And never, ever use steel wool. It will scratch the protective surface and can leave tiny particles behind that will rust.
For Aluminum:
- What to Use: You need to be a bit more gentle here. Stick with pH-neutral detergents.
- What to Avoid: Harsh, abrasive powders and potent chemicals can cause pitting and ugly discoloration on aluminum. Always give it a good rinse, as any cleaning agent left behind can cause it to oxidize.
Beyond Cleaning: Proactive Maintenance Checks
A few minutes of prevention each month can save you a world of hurt later. Think of this as a quick physical for your equipment—it can help you spot a small problem before it turns into a disaster during the dinner rush.
While you're doing your weekly deep clean, just take an extra minute to look for these things:
- Check the Welds: Look closely at every joint where the frame and runners connect. See any hairline cracks or signs of stress? Take that rack out of service immediately. A failed weld on a fully loaded rack is a serious safety hazard.
- Inspect and Lube the Casters: Pull out any hair, string, or plastic wrap that’s inevitably tangled around the axles. Make sure the wheels spin and swivel freely. A drop of food-grade lubricant on the swivel bearings once a month makes a world of difference.
- Tighten the Hardware: Racks vibrate as they roll across the floor, which can loosen nuts and bolts over time. Give them a quick check and tighten up anything that's wobbly.
Meeting Food Safety and Health Code Rules
In a commercial kitchen, your equipment is so much more than just a tool—it's a core part of your promise to keep the public safe. When it comes to bread rack shelving, following food safety and health codes isn't about dodging fines. It's about building a rock-solid foundation of trust with every single customer who walks through your door. Getting these rules right is simply non-negotiable.
One of the very first things a health inspector looks for is that little NSF certification mark on your equipment. This isn't just a sticker; it's a promise that your rack is made from non-porous, corrosion-resistant materials that won't harbor bacteria and are a breeze to clean. Think of it as a seal of approval, telling the world your shelving is built for the rigors of a professional food environment.
Decoding NSF Certification
NSF International is the organization that sets the gold standard for public health and safety in commercial kitchens. For a bread rack to earn that coveted certification, it has to jump through some serious hoops.
- Material Integrity: The materials, usually stainless steel or a specific food-grade aluminum, must be completely smooth and non-absorbent. They can't chip or crack, which means there are no tiny crevices for germs and food particles to hide in.
- Cleanability: The design has to be smart. No sharp internal corners or impossible-to-reach spots. Every inch of the rack needs to be accessible for a thorough cleaning and sanitizing.
- Performance: The rack is also put through its paces to ensure it holds up as intended without breaking down, leaching chemicals, or creating any other safety hazards.
Honestly, choosing NSF-certified bread racks is one of the easiest ways to show you're serious about food safety from day one.
Key Health Code Requirements for Shelving
Beyond that NSF stamp, your local health department will have its own set of rules about how and where you place your shelving. These regulations are all about preventing contamination and making your kitchen easier to keep spotless.
A big one you'll hear everywhere is the "six-inch" rule. Every shelving unit holding food must have its bottom shelf at least six inches off the floor. This is non-negotiable for two critical reasons: it lets you easily clean underneath the units and helps stop pests from turning your storage racks into a highway to your food.
Health Inspector's Perspective: When an inspector walks in and sees equipment sitting directly on the floor, it’s an instant red flag. To them, it screams "pest harborage" and signals that deep cleaning is probably being skipped. Getting your racks elevated is a simple, visual cue that you take sanitation seriously.
On that same note, you'll want to position racks a few inches away from walls. This allows air to circulate properly and prevents dust and grime from building up in those hard-to-clean corners. To get a really good handle on what inspectors are looking for, our restaurant health inspection checklist is a fantastic resource to get your whole operation ready.
Preventing Cross-Contamination
Your bread racks can also be a powerful weapon in the fight against cross-contamination. A great habit to get into is designating specific racks for different stages of production. You could even use a simple system like colored zip ties to mark them: blue for raw dough, yellow for proofing, and green for finished, cooled products.
This kind of simple, visual system helps prevent a rack that was just holding raw, yeast-filled dough from being used for ready-to-eat pastries. It's a small step that dramatically minimizes the risk of transferring unwanted bacteria or allergens. When you're thinking through potential hazards like this, applying the Hierarchy of Control is a smart way to ensure you're creating the safest possible environment.
The need for these strict standards is even greater in high-volume places like supermarkets, where bread racks are constantly in use. The retail shelving market was valued at USD 2.64 billion in 2025 and is projected to hit nearly USD 4.89 billion by 2032. With over 38,000 supermarkets across the U.S., these businesses absolutely depend on efficient, sanitary shelving to manage massive sales volumes safely.
Sourcing Your Racks and Finding Exclusive Deals
Choosing the perfect bread rack shelving is only half the battle. The other half? Finding a supplier you can actually trust. A great partner does more than just move a box off a shelf; they bring industry expertise to the table, stand behind their products, and help you discover exclusive deals that fit your budget.
Whether you're after something brand new or are hunting for a deal on a high-quality used rack, knowing where to look and what to ask can save you from a world of headaches later on.
When you're vetting suppliers, don't be shy. Ask the tough questions. What's the warranty look like? Are there hidden shipping costs? What’s the return policy if it doesn’t fit? A supplier who has their act together will have straightforward answers. If they're vague or hesitant, that’s your cue to walk away.
Where to Find Your Next Rack
You've got a few different paths you can take when it's time to buy.
- New Equipment Dealers: This is your go-to for the latest models, complete with full manufacturer warranties. It's the safest bet for pristine, NSF-certified gear and total peace of mind.
- Used Equipment Suppliers: Going the used route can save you a significant amount of cash, but the quality can be a mixed bag. Stick with reputable dealers who actually inspect, clean, and refurbish their inventory.
- Restaurant Auctions: You can stumble upon some incredible deals at auctions, but they're almost always "as-is." That means if it's got a wobble or a bent shelf, it's your problem now. High risk, high reward.
Our Approach at Encore Seattle: We aim to give you the best of both worlds. We source top-tier, NSF-certified bread rack shelving but offer it at prices that give used equipment a run for its money. You get the quality without the brand-new price tag.
Your Go-To Partner for Kitchen Solutions
Think of us at Encore Seattle as an extension of your kitchen team. Our experts are here to help you discover the latest news and exclusive deals on all restaurant equipment and supplies. We’ve been in this business a long time and understand the real-world challenges restaurant owners and chefs deal with every single day.
Let our experience save you time and money. From helping you nail down the right capacity to making sure you're squared away with health codes, we're here to help you make a smart investment that will pay off for years to come.
Common Questions About Bread Racks
Even with all the details laid out, you might still have a few questions about bread rack shelving. It's totally normal. Let's tackle some of the most common things we hear from chefs and bakery owners to clear up any confusion and help you feel confident about your choice.
What’s the Standard Spacing Between Shelves?
On most standard bread racks, you'll see spacing between 3 to 5 inches. This isn't random—it's the sweet spot for holding standard sheet pans without squishing your beautiful creations. It gives most baked goods plenty of room to cool down with good airflow.
But what if you're making tall artisan loaves or tiered cakes? In that case, keep an eye out for racks with adjustable slides. That flexibility lets you change the spacing on the fly, so one rack can handle everything from flat cookies to towering pastries.
Key Takeaway: For most bakeries, the standard 3- to 5-inch spacing works perfectly. But if you have a diverse menu with varying product heights, adjustable shelving is a smart move that saves you from buying multiple specialized racks.
Can I Use These Racks for Hot and Cold?
You bet. In fact, that's one of their biggest selling points. A good commercial rack, especially one made from stainless steel or aluminum, is built to withstand serious temperature changes. It’s completely normal in a professional kitchen to wheel a rack straight out of a hot oven and into a walk-in cooler or freezer.
This is a huge time-saver. It means you don't have to painstakingly transfer dozens of hot pans from one rack to another just for cooling. Just to be safe, always check the manufacturer’s specs for the temperature range, but this versatility is exactly why they're such a workhorse in any busy kitchen.
Mobile vs. Stationary Racks: How Do I Choose?
This decision really comes down to one simple question: does the rack need to move?
-
Go with a mobile rack if your workflow involves moving products between different stations. Think about it: you’re rolling dough from the prep table to the proofer, then to the oven, and finally over to a cooling area. Those little wheels (casters) make the whole process seamless.
-
Stick with a stationary rack when you need a permanent, rock-solid storage spot. They're perfect for designated zones like a dry storage pantry, a walk-in where inventory sits for a while, or a finishing station that never moves. Their fixed feet give you maximum stability.
Ready to find the perfect bread rack shelving that fits your kitchen's flow and budget? The team at Encore Seattle Restaurant Equipment is here to walk you through the options and help you find great deals on top-quality, NSF-certified equipment. Check out our selection and get some expert advice over at https://encoreseattle.com.